How to Complete a Non-senate Waiver Request in Recruit
APO Updated 6-26-24
All non-senate requests must processed in the UCSC Recruit system, which allows each step of the approval process to be captured in one system. The hiring unit will be responsible for initiating and submitting the waiver request.
Submission of a waiver request does not guarantee that it will be approved. Hiring units are encouraged to consult with their division's academic personnel office before they initiate waiver requests to ensure there is a valid justification.
For more information on the policy, see CAPM 103.500 - Search Waivers and Exemptions for Non-Senate Academic Appointees.
See the our list of the waiver request's required and optional fields.
Table of Contents
Instructions for the Hiring Unit
- Position: Required Information
- Candidate: Required Information
- Appointment: Required Information
- Justification: Required Information
- History: Required Information
Documentation: Submit Additional Information (optional)
Submit the Waiver Request for Approval
Hiring Unit Updates HIRE Status
Initiate a Change Request (request revisions)
Once the Waiver is Approved by the Final Approver
Instructions for the Hiring Unit
Before you initiate a waiver request, first consult with your division to determine if 1) a waiver is feasible, and 2) to determine if the candidate is a current UC employee that can take on a concurrent position.
Initiate the Waiver Request
Please be aware that the waiver request does not have to be completed in one session.
To initiate a request for a waiver of open recruitment, complete the following steps.
- Log in to Recruit using your UCSC Gold credentials.
- Select Waivers from the main menu (see top of screen) to open the Waivers List page.
- Click Create New Search Waiver.
- Enter the position’s proposed working title and the hiring unit’s name in the pop-up screen.
- Click Create Search Waiver.
Once the waiver request has been created, you will be taken to the waiver’s information page with the Position data entry screen being displayed.
The hiring unit must complete the following sections of the waiver request:
- Position
- Candidate
- Appointment
- Justification
- History (only required if there are previous waivers or recruitments for the position or candidate)
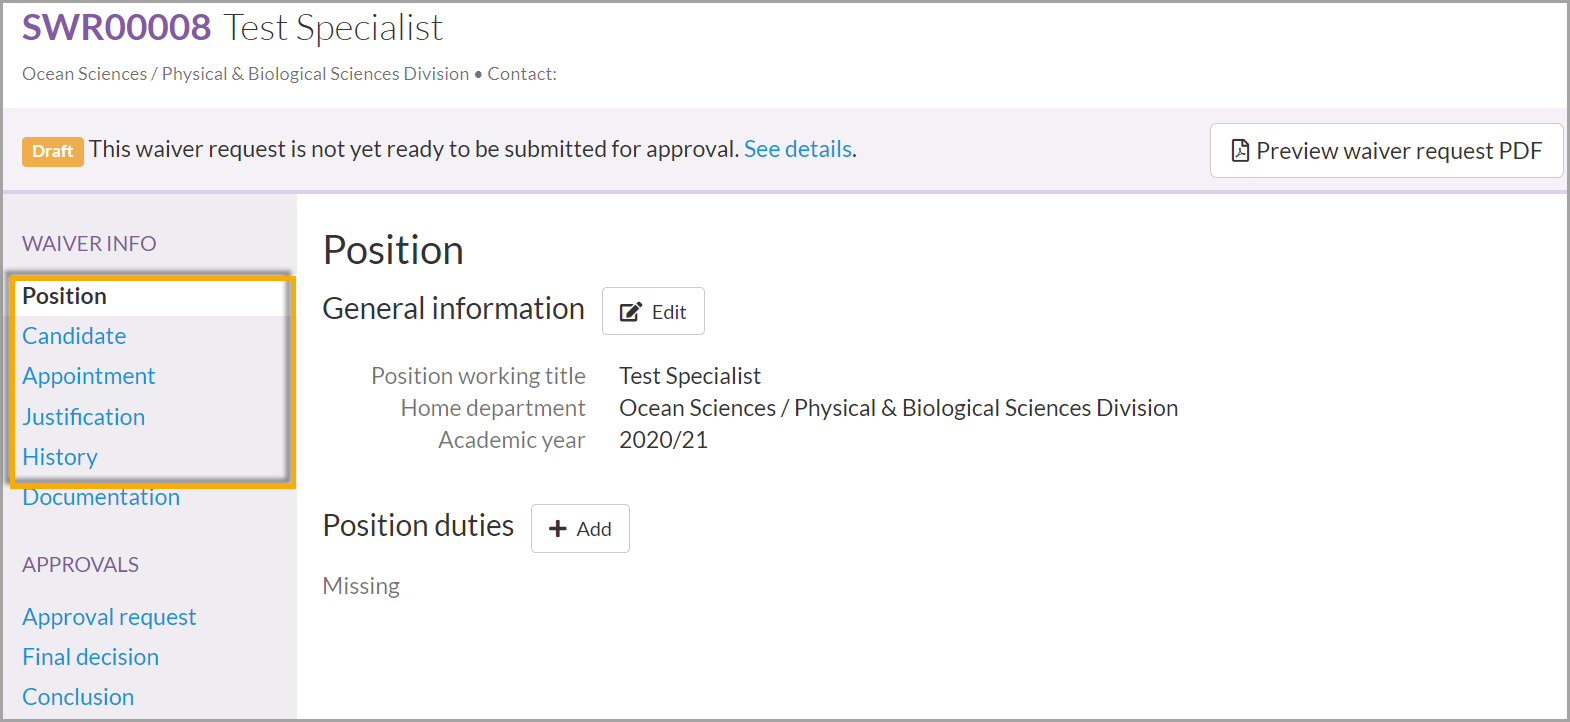
You can access each of the sections’ data entry screens by clicking on their corresponding links in the left navigation menu (see screenshot above).
Return to the Table of Contents
Position: Required Information
The entry screen has two sections: General information and Position Duties.
If the Position data entry screen is not already displayed, select Position from the left navigation menu.
The General Information section of the Position data entry screen is populated with the information you provided when you initiated the waiver request. If you need to edit any of the information in this section, click Edit. Otherwise, move on to Position Duties and complete the following steps.
- Click +Add to open the corresponding pop-up screen.
- Enter the essential duties of the position.
NOTE: Please indicate if supervision duties are a component of the job and identify the positions the proposed candidate will supervise.
- Click Save changes to save your entries and exit the pop-up screen.
Return to the Table of Contents
Candidate: Required Information
The Candidate data entry screen has three sections: Candidate information, Candidate email addresses, and Candidate qualifications.
- Select Candidate from the left navigation menu.
- Click Edit in the section titled, Candidate information, to open the corresponding pop-up screen.
- Enter the candidate’s preferred or lived name.
- Click Choose File to upload a PDF copy of the candidate’s current C.V./ resume (this is required).
- Indicate if the candidate is a current UCSC or UC employee by selecting Yes or No from the drop-down menu.
NOTE: If you select Yes, the pop-up screen will expand and you will need to enter the candidate's current employee ID, the effective date of their initial appointment to the position, the hiring unit/department, the position's title code, step (if applicable), percentage of time, and current appointment's start and end dates. If the candidate has multiple appointments at UCSC (or anywhere in the UC system), you will need to provide the details for each position.
- Click Save changes to save your entries and exit the pop-up screen.
- Click Edit in the section titled, Candidate email address, to open the corresponding pop-up screen.
- Select +Add an email address.
- Enter the candidate’s email address and click Add.
- Select +Add an email address to add another email address or click Save changes to save your entry and exit the pop-up screen.
- Click +Add in the section titled, Candidate qualifications to open the corresponding pop-up screen.
- Enter a brief overview of the candidate’s qualifications that are relevant to the position.
- Click Save changes to save your entries and exit the pop-up screen.
Return to the Table of Contents
Appointment: Required Information
The Appointment data entry screen has just one section, Proposed appointment.
- Select Appointment from the left navigation menu.
- Click +Add in the Proposed appointment section to open the corresponding pop-up screen.
- Select the unit requesting the waiver from the Department drop-down menu.
- Select the position’s applicable title code and academic title from the Title drop-down menu. Consult with your divisional contact if you are not sure of the appropriate selection.
- Enter the position's proposed step. If the position’s academic title series does not include steps, leave this field blank.
- Enter the position's proposed percentage of time (note that a variable percentage cannot be entered).
- Enter the position's proposed start and end dates. If you are requesting a permanent waiver,leave the end date field blank.
- Click Save changes to save your entries and exit the pop-up screen.
Return to the Table of Contents
Justification: Required Information
The Justification data entry screen has three sections: Category, Justification narrative, and Waiver duration.
- Select Justification from the left navigation menu.
- Click Edit in the section titled, Category to open the corresponding pop-up screen.
- Select the appropriate search waiver category from the drop-down menu. See section IV. Search Waivers of CAPM 103.500 for a complete list of the available categories.
NOTE: Never select OTHER from the drop-down menu. Our campus does not allow for the use of this category. This option is hard-coded in Recruit and it cannot be removed from the drop-down menu.
- Click Save changes to save your selection and exit the pop-up screen.
- Check with your department or division to determine if there are any internal expectations for use of the optional Grant information section, such as including any funding details or budgetary approval documentation for the approvers to consider.
- Click +Add in the section titled, Justification Narrative to open the corresponding pop-up screen.
- Provide relevant details that further substantiate the justification for the waiver request.
- Click Save changes to save your entry and exit the pop-up screen.
- Click Edit in the section titled, Waiver duration to open the corresponding pop-up screen.
- Indicate if the waiver duration is time limited (i.e., position is for a finite period of time) or permanent by selecting the corresponding radio button.
NOTE: Permanent waivers are rare and only approved in very specific cases. Consult with your divisional contact to determine if a permanent waiver is permissible.
- Enter the waiver’s effective date (this is the proposed start date of the position).
- Enter the waiver’s proposed end date (an end date for the position is only required for time-limited waivers).
- Click Save changes to save your entries and exit the pop-up screen
Return to the Table of Contents
History: Required* Information
*If the employee has never been employed at UCSC and they are not employed at another UC, proceed to the section titled, Submit the Waiver Request. If you are unsure of the candidate's employment status, please consult with your divisional contact to determine if there is employment history that needs to be provided in the waiver request.
The History data-entry screen is where you provide prior and/or concurrent UC employment for the candidate when applicable. For UCSC employment, this will include appointments resulting from previous, searches, waivers, or exemptions. For employment at other UCs, we are only concerned with current appointments at other campuses.
The History data entry screen has two sections: Discovered candidate history and Added history. If the candidate applied to recruitments in Recruit or if they have waivers that have been processed in Recruit, then the employment history should display in the Discovered candidate history section. Often there will be employment history that is missing (e.g., employee was appointed via a recruitment exemption, their waiver was processed outside of Recruit, their applicant status for a previous or current search in Recruit has not been updated to Hired and the employee ID has not been entered). When there is missing employment history, complete the following steps to add it.
-
- Select History from the left navigation menu.
- Review the Discovered candidate history section to see if recruitment compliance history is displayed. If the Discovered candidate history is accurate and complete, proceed to the next section titled, Submit the Waiver Request. If the candidate history is inaccurate or incomplete, take the following steps to provide the required information.
- Click +Add previous recruitment, waiver, or exemption in the Added history section of the screen.
- Enter the job/search # (e.g., JPF00010), waiver # (e.g., W20-01), or recruitment exemption and its corresponding description (e.g., Ex A ).
- Enter the candidate's name associated with the previous recruitment compliance.
- Enter the title of the position associated with the previous recruitment compliance.
- Select the name of the hiring unit associated with the previous recruitment compliance from the Department drop-down menu.
- Select from the Source type drop-down menu, the category of the previous recruitment compliance (Recruitment, Waiver, Exemption).
NOTE: If the candidate has multiple instances of recruitment compliance (previous searches, waivers, or exemptions), then you will need to repeat the process outlined above to create a separate entry for each instance of recruitment compliance.
NOTE: For the source type Recruitment, an appointment end date is not required if the candidate still holds the position. For the source type Waiver, an expiration date will not be entered for a permanent waiver.
- Enter the relevant fields for the selected source type.
- Click Save changes to save your entries and exit the Add history pop-up screen.
Return to the Table of Contents
Documentation: Optional Additional Information
You may upload any additional PDF documents regarding the waiver here. These will be visible to approvers. If the waiver is being requested due to a medical situation, do not include medical details or any Protected Health Information.
Check with your department or division to determine if there are any internal expectations for use of this section, such as including budgetary approval documentation for the approvers to consider.
Return to the Table of Contents
Submit the Waiver Request For Approval
If you have successfully entered all of the required information for the waiver request, you will see the submit it for approval link above the waiver information page.
However, if any of the required fields have not yet been completed you will instead see the See details link above the waiver information page. Click on this link to be taken to the Waiver Request Checklist and see what information is missing.
-
-
- The Waiver Request Checklist displays the waiver request's required sections ( except the History section) and their required fields.
- If a field has been completed a checkmark displays to the left of the field. If a field has not yet been completed, a solid orange circle displays to the left of the field. Click on the Add now link to be taken to the field that you must complete.
-
Once you have completed the required sections, review your entries to ensure the information is correct by clicking Preview waiver request (displayed in the upper right-hand corner of the waiver information page). Clicking on the Preview waiver request button opens the most recent version of the waiver request in the PDF format that will be made available to the approvers.
If you revise any of the request’s information, the PDF will live updatee. Additionally, the Draft watermark displayed diagonally across the document will disappear once all approvers of the report have submitted their final decisions (i.e., approved or rejected).
Once you are satisfied the waiver request is complete, take the following steps to submit it.
-
-
- Click submit it for approval (located above the waiver informationn page).
- Click Yes submit for approval to initiate the approval workflow and be taken to the Approval request screen.
-
In the Approval request screen, the list of individual approvers will be listed and an arrow will display to the left of the first approver’s name. Once the approver has approved the waiver request, the arrow will change to a thumbs up icon and the arrow will advance to the next approver.
Ensure Approvers Are Identified for Each Level of Review
You must ensure each approver is identified by name , otherwise the approval workflow will stall when the report advances to a step where an approver is not identified. Acceptable approvers for the first approver level is the unit’s department chair, college provost, Principle Investigator (PI), and non-staff supervisors (e.g., an academic coordinator serving as a program director).
In some cases, the system automatically pre-populates the approvers, but when it does not you must manually enter the approver by completing the following steps (please consult with your division if you are unsure as to who should be entered for the request’s approvers).
-
-
- Select Specify person if an approver(s) is not listed.
- Enter the approver's name or CruzID in the pop-up screen.
- Select the approver's name once it displays below.
- Click Add.
- Click Edit approvers if you need to enter multiple individuals who can serve as the approver for a specific level, repeat steps 1 through 4.
-
Return to the Table of Contents
Check the Waiver Status
The status of a waiver is found at the top of the Waiver information screen.
The available statuses are defined below:
-
-
- Draft: The waiver hasn't been submitted for approval.
- Pending approval: The waiver has been submitted and is pending approval(s).
- Changes requested: An approver has requested changes before the waiver can be approved. See the approver’s approval request comments for details.
- Pending Final Decision: The waiver has been approved and is ready for the final decision.
- Approved: The waiver has been approved by all approvers named.
- Declined: The waiver has been declined by the final authority.
-
In the event that a search waiver was created in error, analysts at the department or college level can delete their search waiver provided that they have not submitted it for approval. Once it has been submitted, only the Academic Personnel Office is able to delete the waiver. Please be aware that once a waiver is deleted, this action cannot be reversed.
Once fully approved or declined, search waivers are locked and no further changes can be made . However, analysts at the department and college levels will still be able to add the hiring outcome.
Return to the Table of Contents
Instructions for Approvers
When a report or waiver request has advanced to you, Recruit will send you a system generated email (provided you have not revised your Notification settings in Recruit to disable the notifications). Alternatively, you can check your Approvals screen to see the status of any waiver requests or system reports.
To ensure you see all reports and waiver requests assigned to you, be sure that your workspace ribbon is set to default (see screenshot below), which will have the Approvals filter set to TO DO, meaning that the workspace will display approvals that are now in your queue and waiting for your decision.
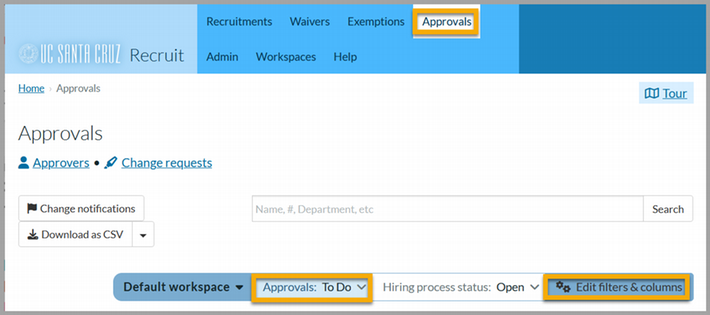
If you want the Approvals workspace/page to display more information than the default view, you can update the workspace ribbon by clicking Edit Filters & columns (see screenshot above) and making your selections in the pop-up screen.
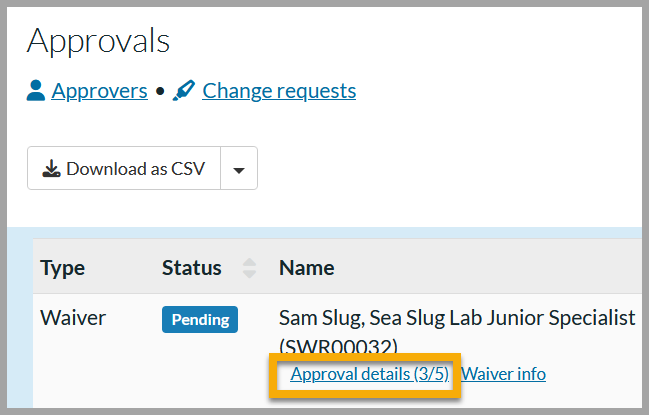
Approvers are divided into three stages: the current approver, the upcoming approver(s), and the previous approver(s). The current approver shows up top. This is the next person who needs to weigh in and provide a decision.
Review the Waiver Request
From the Approvals page, click on the Approval details link of the waiver request you want to review. Clicking on this link will open the waiver's Approval Request screen.
Please be aware that when the request has advanced to you, an arrow will appear to the left of your name in the Approval request page. If you instead see a clock icon to the left of your name, that means the waiver request is with an earlier approver and it is not yet your turn to provide your decision.
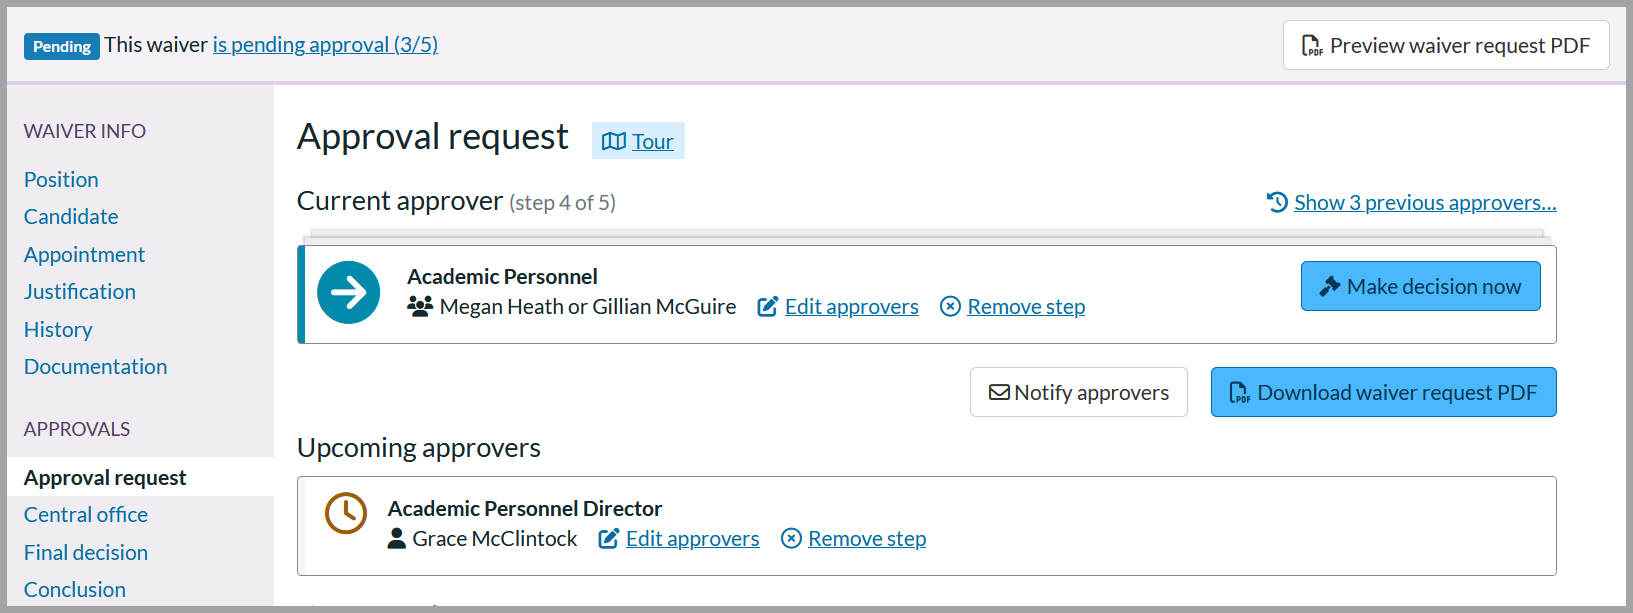
To review the waiver, click on the Preview Waiver Request button (displayed in the upper right-hand corner of the Approval request page).
Once you have completed your review of the request, you can either approve the waiver request or you can request that changes are made. Each of these actions are further defined below.
Initiate a Change Request
Select this option to withhold your approval and specify the changes in the corresponding Comment field. The staff member who initiated the waiver request will be notified of the change request, and the approval workflow will be paused until the staff member makes the necessary changes and resolves the change request. Once resolved, the waiver will be returned to your approval queue.
In the Approval request screen, click on the blue Make Decision Now button.
Select Request changes and explain what revisions must be made in the Comment field below.
If you want a previous approver to be required to once again review the waiver once the corrections have been made, and before it is returned to you, click on the When resolved, require a review from you link (displayed below Request Changes). Select the applicable approver from the available drop-down list.
Review your entries to ensure your instructions are clear.
Click the Request changes button to save your entries and initiate the change request. Be aware that once you initiate the change request it cannot be edited or revoked.
Once the change request has been initiated, your approval step will be highlighted in orange and include a pencil icon next to it.
Please be aware that you cannot approve the waiver request if there is an outstanding change request initiated by you or earlier approvers.
Approve Waiver Request
Select this option to provide your approval of the waiver request in its current state. Please be aware that once you approve the waiver request, you will not be able to change your decision and the request will advance to the next approver.
To approve the waiver, simply click on the green Approve box and then click the Approve button at the bottom of the pop-up screen to confirm your decision.
Return to the Table of Contents
Once Waiver is Approved by the Final Approver
Once the waiver is approved by the final approver, the unit has recruitment compliance to proceed with the appointment review of the candidate.
To quickly access the waiver's recruitment compliance begin date, click on the Final Decision link from the left navigation menu. The date listed in the screen is the compliance begin date.
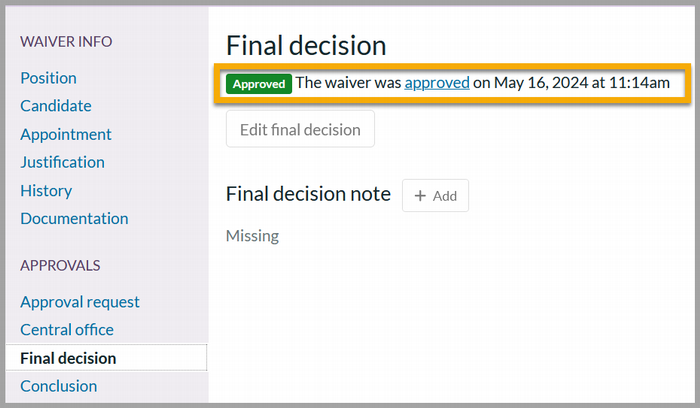
If you want to see the waiver's approval history and any related comments, click on the Approval Request from the left navigation menu to access the Approval Request screen.
Return to the Table of Contents
Hiring Unit Updates Hire Status
Once the candidate has been officially hired (the appointment has been entered in UCPath and it has been posted in DivData [see Person record/ Salary tab]), or the candidate declined the position, the staff member who initiated the waiver request must update the candidate's final status in Recruit.
-
-
- Navigate to the waiver and click on the Conclusion link from the left navigation menu.
- Next to Hiring outcome click +Add and select Yes or No from the drop down menu. If you selected Yes, complete the Appointment Start Date and the Employee ID fields (refer to DivData for this information).
- Click Save changes.
-
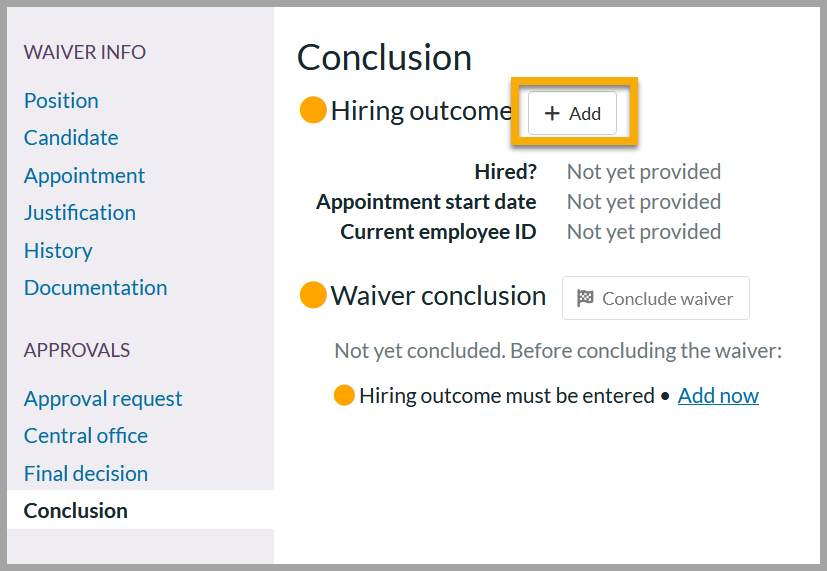
Please DO NOT click on the Conclude waiver button. This last action will be completed by APO (further details provided below).
It is critical for you to update the candidate’s final status immediately after the waiver’s effective date has passed (e.g., no later than a week after the effective date). This will prevent you from having to drop everything to complete these final steps in the event we have reports that must be submitted to the University of California’s Office of the President or outside agencies.
Return to the Table of Contents
Concluding the Waiver
Only APO’s Recruitment Team should conclude waivers and the team will do so once the hiring outcome has been completed by the hiring unit’s Recruit Analyst.
Once you have updated the Hire status for the waiver's candidate, email the APO Recruitment Team (Megan Heath and Gillian McGuire) to alert them that the waiver can be concluded. After the Recruitment Team reviews the entries, the waiver will be concluded.
